Showing posts with label Easter. Show all posts

Saturday, April 11, 2020

Easter Egg Nests

Here is a simple recipe for a fun Easter treat.  We are still home trying to do our part to flatten the coronavirus curve.  So we need to fill our time with fun activities.  I mean you have to do something besides argue with your kids, right?  Just kidding.  Maybe.  Anyway....  

This is one we do almost every year, but this year we almost didn't make them.  Last time I was at Walmart I couldn't find the chow mein noodles.  Things just aren't in stock as they normally would be.  But as luck would have it, my daughter found some at the back of our cabinet and they weren't stale.  Good find!  


Easter Egg Nests

Ingredients:

One can or bag of chow mein noodles
One bag of butterscotch chips
Cadbury mini eggs (or jellybeans)

Melt butterscotch chips in the microwave for 30 second intervals, stirring in between.  Once chips are melted, pour in chow mein noodles.  Using two spoons, carefully scoop out mixture and place on wax paper or plastic wrap, creating a nest shape.  While the nests are still melty, place 1-3 eggs on top.  Let set for at least a half hour before eating.

Thursday, April 9, 2020

Paper Mache Easter Eggs


We made our string eggs the other day and that was fun, but because we were all home due to the coronavirus pandemic quarantine we definitely had some time on our hands for more fun crafts!  Enter paper mache eggs.  

I've done paper mache with the kids in the past, but my daughter was too young to appreciate it at the time.  This time, now that she's older, my she had a lot more fun.  She's actually quite the talented artist!  Look at her alien and Stitch.  So cute!


Before we started I did a little research and watched this video to decide what recipe we should use.  I was waffling between glue and flour recipes.  I've done the no-cook flour recipe multiple times in the past and it's definitely a good standby, but I was concerned about wasting resources when I wasn't sure the next time I would get to the grocery store.

We are still free to move around and go to the grocery store, but face masks are recommended and there is a limit of how many people can enter the store at one time.  I believe the limit at Walmart is 200 people.  That sounds like a lot, but if you've ever seen my local Walmart parking lot, you know that number is low.  All that to say, I wanted to use the gallon of glue I had on hand for slime making (now since banned in my household!) and not the precious flour in the cabinet.  


Above you can see all the newspaper we cut into strips and our containers filled with diluted glue.  We just dipped each strip in glue, used our fingers to remove the excess, and applied to the balloon.  We did a total of about 3 layers and it took about 2 days to dry fully.


I will say that the glue paper mache did seem to create a lumpier finished product.  It just didn't lay the same on the balloon as the flour version.  You can see in the picture below all of the lines from the paper.  I don't remember it being that stark with the flour recipe.  It's been a few years, though, so I could be mistaken.  I think maybe the thickness of the flour recipe creates a more uniform paste around the whole thing.  That's my theory, at least!


Below is one last photo of the eggs I painted.  They turned out alright, but I like my daughter's eggs best!  She really did a great job!


If you missed it, here is a link to the video I watched and it compares flour and glue paper mache. You decide what you like best!

You might also like:
String Eggs

Tuesday, April 7, 2020

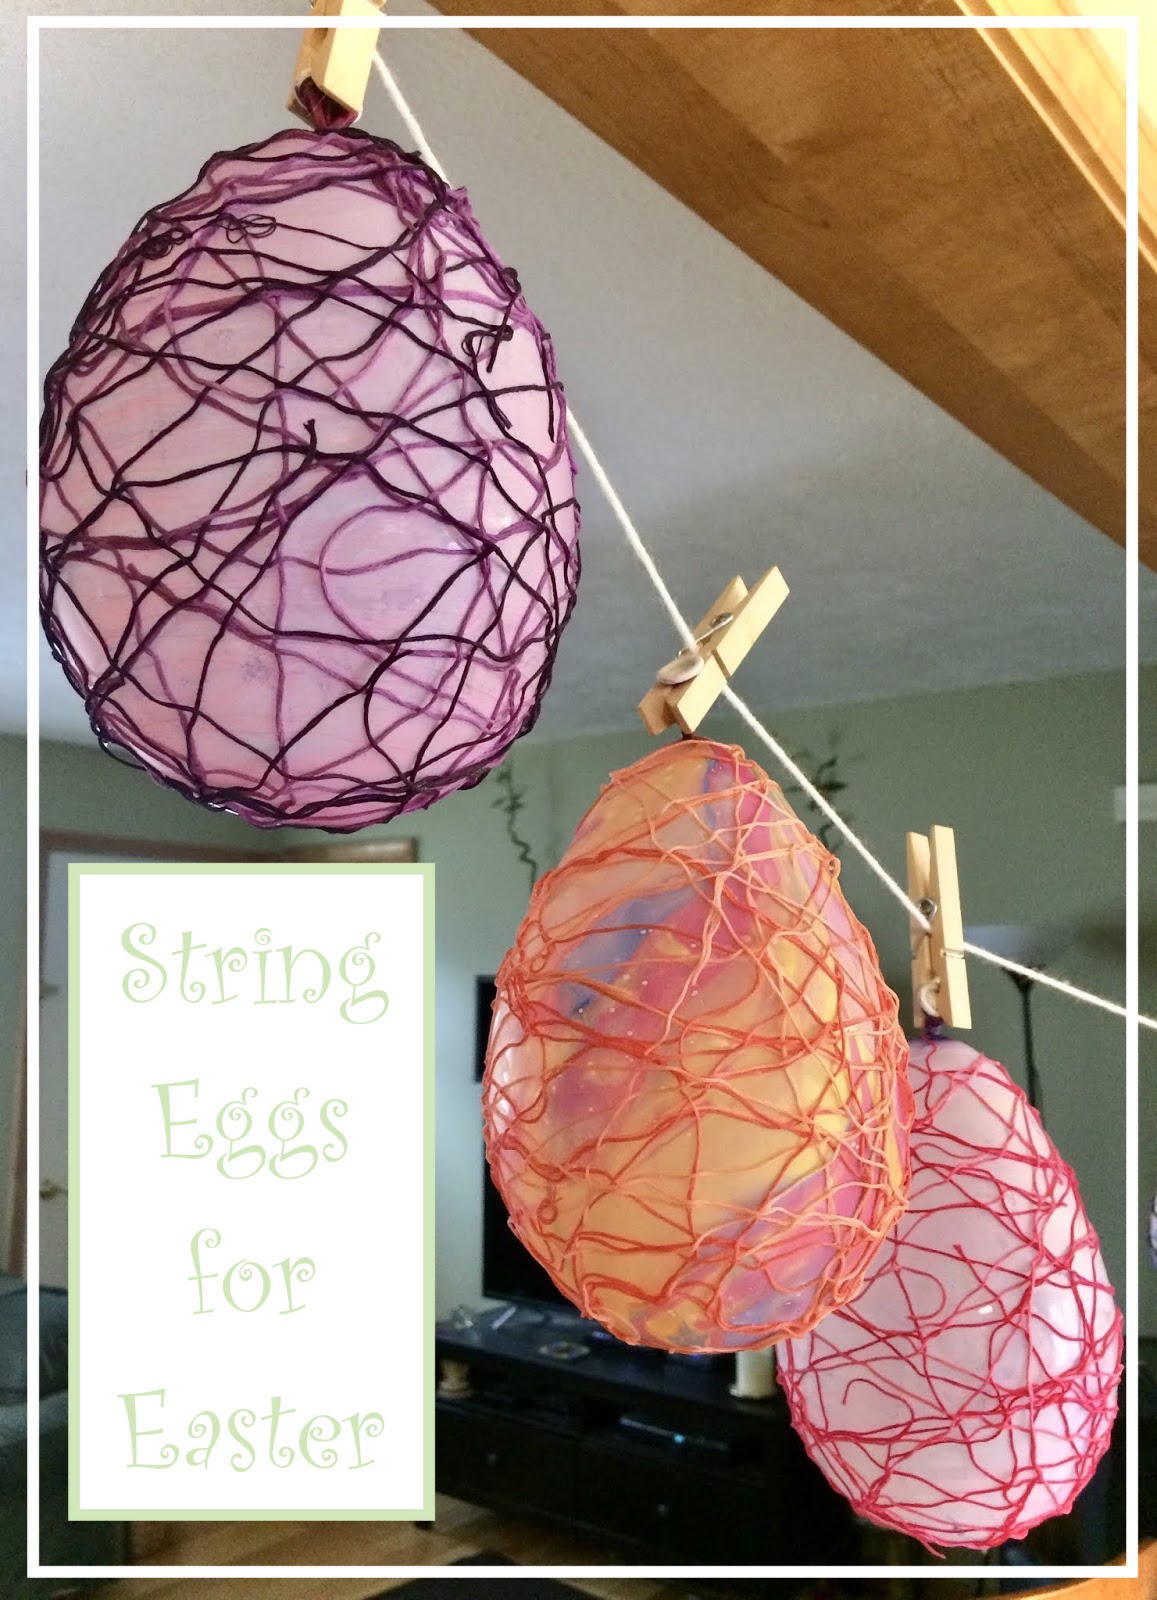
String Eggs


During this pandemic quarantine we have to find things to do.  One of those things can be making masks.  It's a worthy and useful thing to do.  If I'm honest, though, I like to add in some other things just for the pure fun of it!

I have a back-stock of craft activities and supplies, so I'm well prepared!  I made these eggs with my son one year with his homeschool group but we used yarn that time.  To put it bluntly, yarn was not the best option.  


I can't remember if we used decoupage medium the last time, but this time we used diluted Elmer's glue.  There is no specific ratio, just enough water to thin the glue to a slightly thinner consistency that will not stick in clumps to the string and a bit of salt to prevent molding.

So I mixed up some diluted glue and salt, and the kids and I blew up some water balloons and we got started.  All we did was dip the string into the glue, pinched our fingers and ran them down the string to take off the excess glue, and wrapped the string randomly.


I strung up a clothesline between rooms to dry the eggs. While it was certainly a slight hazard (LOL!), it made a great spot to dry our creations.  We dried them overnight and the kids were anxious to pop the balloons right when they got up in the morning.  


I was a little disappointed at how they came out.  You can see from the pictures that there is a lot of glue left behind.  I tried picking it out with tweezers but, yeah, after a couple minutes I was all set with that!  

They look cute piled in this Easter basket.  You could use them as a nice centerpiece for your table.  In the end, though, I decided to string them back up and hang them from the doorway.  They look adorable and they aren't close enough to pick at their imperfections.


With everything going on right now with COVID 19, it's nice to see a little festivity.  Easter is coming this weekend and it's sad to me that we can't spend it with others.  I will miss our choir cantata and family celebrations complete with ham and Easter egg hunts.  


We will do our own thing this year and it will still be fun.  We will have a turkey and candy and do an Easter egg hunt.  We will do some more crafts and still have a good time.

It's just funny.  For years I have thought of myself as an introvert, and I still think that's true.  But I realize getting out and being around people is vital to the human spirit.  I'm glad I have my family around even if the kids drive me nuts!

Here is a link if you'd like more detailed instructions.  Happy crafting!

You might also like:

Pompom bunnies
Easter Eats

Saturday, April 4, 2020

Cooking and Crafting During COVID 19

I didn't plan on writing here again.  I haven't written in over a year and I thought it was time to shut down.  But unprecedented times are upon us and we all have a little more free time.  I found myself not wanting to start from scratch on a brand new platform, and yet I wanted an outlet and way to keep track of what I was doing during this very strange time. I wanted to add to what I've already done because it's fun.  

Honestly, I thought about switching all of my content over to Wordpress and even began the process.  I thought of doing this years ago because it would more easily allow me to turn a profit while blogging.  But I re-evaluated and remembered the purpose of this blog is not to make money (though that would be awesome!) but to keep a log of the things I make and do and share them with you.  I can do that perfectly well on the blogger platform.  

I love looking back at what I've made and some of the projects I've done with my kids.  I am a record-keeper by nature and being able to see the things I've created in the past really makes my heart happy.  It's almost like a way of leaving my mark in the world, however small.


So I'm starting back up again as I've done before.  The next post will be on the string eggs we've made for Easter.  This Easter will be void of large group celebrations and church gatherings.  The cantata our choir has practiced will go unsung and Maundy Thursday and Good Friday communion will go uncelebrated.  Schools will be empty again this week and we will stay at home.  Stores will be filled with masked and gloved people and shelves of toilet paper will be unfilled.  It is a weird time.

I've been trying add cooking and crafts to the (very loose) daily schedule.  I've also been giving the kids freedom to do things on their own.  But don't get me wrong, these times are trying and our patience grows thin more than I'd like.  So happy faces and pretty crafts may not reflect full reality!!  LOL!  


Friday, March 16, 2018

Pompom Bunnies


I got inspiration for this cuddly Easter craft here.  There was, of course, a pin that led me to it.  Pinterest rocks!  Although our bunnies aren't quite like the others that inspired them, I think they are darling.  And my daughter is getting so good at crafting!  She made the white one.  Adorable, right? 


To begin this kid-friendly craft, you'll need to make two pompoms.  First you wrap a bunch of yarn around a piece of cardboard.  Just when you think you wrapped enough, wrap some more.  Trust me.  You don't want small, sad pompoms.  


Once you have wrapped a whole bunch of yarn around, slide another piece of yarn into the space and tie it off.  Then pull the whole bunch completely off the cardboard and snip the circle in half, being careful to avoid your tie-off yarn.  Now start snipping and trimming until you get a pompom you like.  Click here for more detailed instructions on making pompoms.


Once you have made two pompoms, one slightly larger, hot glue them together.  Next, cut out some felt ears and glue them into place.  Finish it off with some googly eyes and a felt or foam nose.  

Voila!  


These are great for the kids!  Of course there must be hot glue supervision, but the rest is no fuss!


Pompom Bunny

Supplies
  • yarn
  • small piece of cardboard
  • felt for ears and nose
  • googly eyes
  • hot glue
Make pompoms according to instructions above.  (Alternatively, you may purchase pre-made pompoms.)  Glue the pompoms together.  Cut out ears and nose from felt.  Glue ears behind the smaller pompom then affix the eyes and nose.  
*I elected to exclude whiskers, but you could easily add those on with more yarn or fishing line.

------------

You might also like:

Thursday, April 6, 2017

Easter Eats


If you're looking for ideas for your Easter feast, look no further!

The first thing we make every year is hard boiled and dyed eggs.  The kids love it.  I'm not sure they'll ever really grow tired of it.  I never have!  As the years go on the designs get more elaborate and the hands stay cleaner, but the tradition remains the same.

Typically we only hide our plastic eggs, so we have a bunch of hard-boiled eggs available for eating on Easter morning.  These make a quick and easy breakfast for everyone!

Here are some eggs we've decorated in the past.  I do recommend rinsing off the sparkles if you use those!

Sparkly Eggs


Along with your hard boiled eggs for protein, you can't go wrong with a cinnamon treat!  This is a recipe for the absolute best homemade cinnamon buns I've had.  Part of the trick is using the bread machine to make the dough.  It kneads it perfectly and lets the dough rise at the ideal temperature.  The result is smooth, fluffy dough that puffs up just right.  You'll want to try these for sure!

Cinnamon Buns for the Bread Machine


Once it's time for lunch, you'll want to use up some more of those hard boiled eggs.  One of our favorite ways to prepare them is deviled eggs.  My husband can down half a dozen without trying!  Check out this cute version I made inspired by a magazine article.  They are adorable, don't you think?

Deviled Chicks


For lunch we traditionally have ham and potatoes.  I love scalloped, but twice-baked and mashed are also great!  I usually try to get a spiral ham if it's on sale, but sometimes I get the whole, unsliced ham and that's is quite delicious as well.  Typically I skip the glaze because I find the ham just right without it.  If I'm making the whole ham I like to top it with pineapple rings and maraschino cherries. If you do this, be sure and save some of the pineapples and cherries for the recipe below!

For dessert, one of my favorites is pineapple upside down cake.  It's an older recipe and my mom used to make it often for Easter when we were kids.  Follow this link to for a most delicious treat!

If you're not in a sugar coma by this point, check out these adorable cupcakes and cake.  They were, like the deviled chicks, inspired by a magazine article.  I found the marshmallow bunnies while I was out shopping and I thought they would be adorable on these grassy green cakes.  I have no separate post or recipe about the cupcakes, I just thought they were too cute not to include!


To make the cake, just bake up your favorite box mix or other favorite cake recipe.  Pour half into an oven-safe bowl and the remaining into a cupcake tin with liners.  Bake as directed.  Frost with any icing you like, then top with  *grass and decorations.   Here's a recipe for icing if you need it.

*To make the grass, empty a bag of coconut into a bowl and squeeze in a few drops of food color.  Mix until color is evenly distributed.  Voila!  Grass.

The jelly beans, by the way, are Starburst jelly beans, my fave!

Do you have any favorite Easter recipes or traditions?  Comment below to share.


You might also like:

The Best Buttercream Icing
Barbie Cake
Minecraft Birthday Party


Tuesday, April 4, 2017

Pineapple Upside Down Cake


This is a traditional Easter recipe from my mother's collection.  I like my mom's recipe but I tweaked it slightly in order to omit the shortening and add a little more pineapple tang.  The original recipe is below and my modifications are in the parentheses.  Enjoy this old fashioned favorite!


Pineapple Upside Down Cake


Ingredients:

  
1/4 cup butter
5 canned pineapple slices, drained and halved
1 cup white sugar
1/2 cup shortening (sub coconut oil)
1 teaspoon vanilla
1 1/2 teaspoons baking powder
2/3 cup brown sugar
9 maraschino cherries, drained (optional)
1/2 teaspoon salt
2 eggs
2 cups flour
1/2 cup milk (sub pineapple juice from can)

Melt butter in 9-inch round cake pan.  Brush sides with butter.  Add brown sugar to butter.  Place over low heat on stove and stir until blended and remove from heat.  Arrange pineapple halves in a pinwheel pattern on top of sugar mixture.  Place cherries in center of pineapple slices.  In a bowl, cream white sugar, salt and shortening (or coconut oil).  Beat in eggs one at a time until fluffy.  Add vanilla.  Mix together flour and baking powder.  Add alternately with milk (or pineapple juice) to creamed mixture. Pour batter over pineapples.  Bake 1 hour at 350 degrees.  Turn onto a serving plate immediately.  Serve with with whipped cream.


Here's the cake I made for Easter without maraschino cherries.  Also, I made it square because my round pan was packed due to us moving!  I'm always ready to improvise.  

You might also like:
Deviled Chicks
Spinach Bread
Lemon Blueberry Cake

Saturday, April 7, 2012

Deviled Chicks


I originally saw this recipe in a magazine (Deviled Egg Chicks) and also in a link from an email my mom sent me.  I decided that since the kids had their fun dying Easter eggs earlier, it was my turn to have fun making this delicious snack for tomorrow.


After my eggs had been hard boiled and cooled, I cut them in a zig-zag pattern.  Next I scooped out the yolk and put it into a bowl. I found the using my fingers was the easiest way to get the yolk out without damaging the egg. I did have a few casualties anyway.  I then mixed up the yolks with some mustard, seasoned salt and mayo.  I put the mix in a pastry bag with a star tip and put it aside.